DIY Dog Crate Console Table *Build Plans*
- The Tiny White Shoebox

- Feb 12, 2019
- 6 min read
Updated: Feb 12, 2019
Ok y'all, this is my first ever tutorial so bare with me! I'm really nervous about this post, as I've never done anything like this before, but here goes nothing!


Drew and I have 2 dogs. Sampson, the big brown mutt; 5 years old, loves napping, napping, and more napping. Klaus, the purebred German Shepherd; 1.5 years old, loves protecting our house, running our house, and sometimes chewing our house. And so, since he is still a puppy even though he is full grown in size, we have to keep him crated whenever we leave the house.
Hence, the issue at hand.
My house is a little over 800 square feet and I don't even have enough room for a kitchen table in my kitchen, let alone a giant wire dog crate. Nor do I like sitting on my couch with front row view of puppy jail. We tried to put the crate in different corners of the living area, but it always stuck out like a sore thumb. I had seen people with dog crates built into end tables or TV stands, but the price that merchants were selling them for were upwards of $1000, and that wasn't in my budget. So I asked Drew if we could try to make one ourselves, with a few alterations, and of course he said he'd give it a go.
So without further adieu, here are the build plans for our dog crate console table, with removable crate option!
Materials needed:
- 15 pine 2 x 4's
- 7 48 inch planks/slats 2 inches wide each (we used poplar)
- 1.5 inch pocket hole screws
- Kreg Jig Kit
- Wood clamps (various sizes)
- Miter Saw
- Impact Driver Drill
- Orbital Sander
- Nail gun and nails
- Wood Stain/Paint
- Fabric/curtains
- Planer (optional, but helpful)
- Decorative finishing pieces (optional)
Tips before you get started:
- We used our planer to make sure all the 2 x 4's were as straight as we could get them before we got started. This is a lengthy process, but it definitely pays off at the end when your piece looks a lot more professionally crafted.
- Measure EVERYTHING! Measure, measure, and measure again. I drive Drew nuts with this, but we had a few mistakes when we didn't do this, and we avoided a few mistakes when we did.
- Our crate is HUGE! Klaus is 100 lbs and very tall for a German Shepherd. The crate we have is the Kong Wire Crate and it measures 43 in L x 29.5 in W x 30.5 in H. ... IF YOUR CRATE IS NOT THIS SIZE, YOU WILL NEED TO ALTER YOUR BUILD PLAN MEASUREMENTS ACCORDINGLY!!!!!!
- When you are drilling your pocket holes, remember that none of the pocket holes should be facing outward so that they can be seen on the outside of the table. All the pocket holes should be facing interiorly, which hides them.
- It helps to have a very large workspace, as this ends up being a very large piece. It can also get quite heavy to carry/difficult to get through certain doorways, so we brought the frame into the house before the table top was attached, and attached the table top to the frame once we had it inside.
Building The Frame:
- Cut 2 pieces of pine to 62 inches in length, and cut 2 pieces to 31 inches in length.
- Drill pocket holes using Kreg jig into the ends of the 2 smaller pieces. Use pocket hole screws to attach these pieces to the 2 larger pieces, forming a rectangle. This will be what your table top rests on. Measure from corner to corner diagonally to ensure that your measurements are precise.
- Cut 2 more pieces to 31 inches in length. Drill pocket holes into both ends of each of these pieces. These will serve as support pieces. Measure from one end of the rectangle to where the end of your dog crate would fit. For us, this was 43 inches. Attach one board in the rectangle at 43 inches, and the other at 17 inches. Your rectangle will now have sections dividing it. The area in the picture below highlighted in green should be what you now have.

Attaching The Legs:
- Cut 6 pieces 32 inches (height of legs).
- Drill pocket holes into one end of each "leg".
- Screw 4 legs into the frame's 4 corners with pocket hole screws. The pocket holes should all be facing the inside of the frame. The narrow side of the boards should be facing the front and back of the table.
- Screw in the remaining 2 legs to the part of the frame that will separate the area for the dog crate and the area for the shelving. For us, this was the 43 inch part.
- You should now be able to slide your dog crate in and out of the area you have built for it, and it isn't a bad idea to bring your crate out and test this to be sure.
- Cut 2 pieces 14.5 inches in length. These are the pieces your smaller planks will rest on and be nailed to when you are making the shelf part of the table.
- Drill pocket holes in both ends of each piece.
- Attach each piece with pocket hole screws to the 4 legs where shelving will go at your desired shelf height. One piece can be seen on the front and one will be on the back. I wanted to be able to fit a basket underneath on the floor, so just keep anything like that in mind when you are making this decision.
- Your table should now look like this...

Building The Table Top:
- Cut 10 pieces of 2x4's to 63 inches. It is important to be exact on these measurements, so that you don't have to sand down the sides of the table top for days on end.
- Decide which side of the boards you want to be the top of your table and which sides you want facing down. Mark the side you want on the top with a letter T. You will not be drilling the pocket holes on the "T" side.
- Place your boards "T" side up in the order you want them to go. I'm very particular about how I want things to look so I made sure all the different levels of grain were spread out, but this is all totally your preference.
- Once you have your boards place how you want them, flip them all over to the side you will be drilling the pocket holes into. Drew drilled pocket holes in each board on each end and in the center of the boards. You want to make sure you are drilling the holes so that you can pull the boards together, so don't drill them in the exact same spot on each board. The table top should look like a picnic table top, and you are attaching them together in that manner.
- Clamp the 2nd board down and screw the first board to the second board, making sure the ends of the boards line up as evenly as you can make them.
- Repeat this process until all 10 boards are attached to each other and you now have a sheet of wood that looks like a table top.
- Sand the table top as desired starting with a lower grit (we used 60) and moving to a higher grit second (we used 220).
- Take a mobile Kreg jig and secure it to the table frame where you want to attach the table top. You will be drilling the holes up through the rectangle to the top of the frame. We put our pocket holes in all 4 corners of the frame.
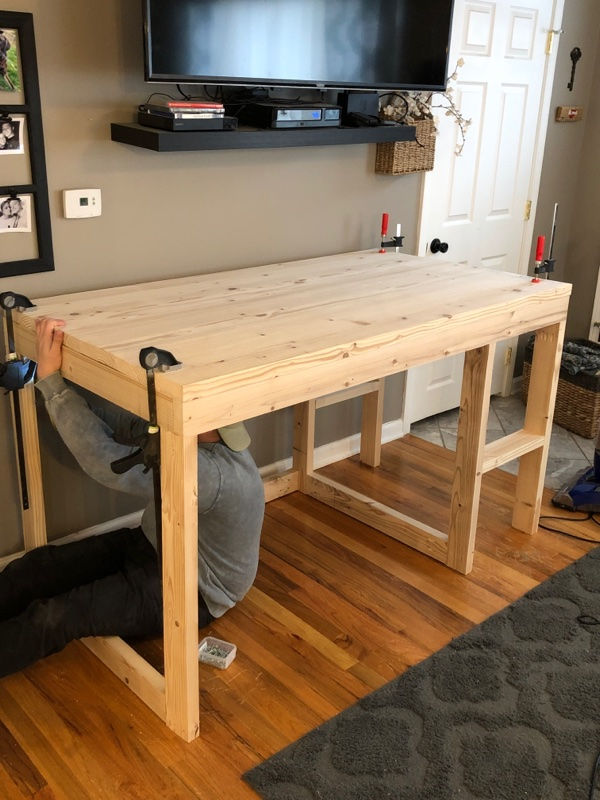
- Place your table top as you want it to sit on your frame. You should have some overhang on the sides. Once you have it in place, clamp all 4 corners to the frame and screw pocket hole screws into the pocket holes from underneath.
- You can add extra supports, which we decided to do later, at the bottom of the area where the dog crate sits, on the back and sides.
- Your table should now look like this...
Building The Shelf:
- Cut your 2 inch planks to 33.75 inches in length. You will need 6-7 planks. We used a nail gun and just nailed each plank to the shelf support boards.

AND THAT'S IT! After that you just stain and/or paint as you want and attach fabric/curtains and any decorative pieces that you want to finish it off with! I am obsessed already, and I hope this tutorial was helpful for those of you who have been asking how we did this!!


Comments